
Building
From CatCraft Wiki
Contents
- World Information
- Claiming Land Information
- How to Claim Land
- Extending Claims
- Viewing Claims
- Subdividing Claims
- Creating Subdivisions
- Claim Permissions
- Public Claim Permissions
- Removing Claims
- Banning players from claims
- Claim Removal Guidelines
- Mob Cap Limits
- AFK Spot
- Troubleshooting Villager-based Farms
- Villager Breeders & Iron Golem farm Troubleshooting
- Private Chests
- Top Building Tips from the Builders of Catcraft
World Information
| World | Red Realm | Green Realm | Blue Realm |
|---|---|---|---|
| Overworld | 45k x 45k | 50k x 50k | 58k x 58k |
| Nether | 25k x 25k | 25k x 25k | 25k x 25k |
| End | 50k x 50k | 50k x 50k | 50k x 50k |
| Resource World | 25k x 25k | 25k x 25k | 25k x 25k |
- The Overworld never resets and the world-border may increase in size over time. However, on the Red and Green Realms, land in the Overworld that is not claimed and that nobody has visited for 30 days can regenerate as fresh terrain. Claim your builds to keep them safe. See Claims.
- The Nether world resets every three months, with a new seed.
- The End world resets every month. This is to give all new players an opportunity to find fresh end world treasures.
- The resource world resets every two months. This world is the same as the overworld, but it provides players with a new location filled with precious ores, untouched forests, and an entirely fresh world to explore.
Claiming Land Information
Claiming your land is essential to prevent unwanted visitors from building or taking things from your base. Claims are a square region of land, that prevent other players from breaking, building, slaying mobs or interacting with anything inside the protected region. All players receive ‘200 claiming blocks for every hour’ from actively playing on Catcraft. There is a soft limit of 80k claim blocks from actively playing on the server. Bonus claim blocks can be gained from vote crates, cat crates, and from the server web store. For starting blocks, minimum claim sizes and when claims expire, see Claims.
How to Claim Land
https://www.youtube.com/watch?v=VDsjXB-BaE0
Typing /kit claim will give you a golden shovel and stick, which will be used for claiming & checking land claims.
- To start claiming, hold onto your golden shovel in your main hand, and right-click on the ground for where you want your first corner of your claim to be.
- Continue holding onto the golden shovel, as you walk across to the second corner of your claim, and right-click the ground.
- You can also claim land by typing /claim [blocks]
- The size you input will correspond to the number of blocks from your current position to the new border of the claim.


Extending Claims
- Claims can be resized by simply right-clicking the corners of your current claim (the golden blocks).
- Claims can also easily be extended by typing /extendclaim [blocks]
Viewing Claims
Right-clicking the stick on blocks or distant land, will tell you whether that region has been claimed by someone else. The Gold blocks and glowstone shows the borders of the claim. Any subclaims are temporarly shown as iron blocks and wool.
Hold sneak + right-click to see all nearby claims.
Subdividing Claims
Subdividing claims allows you to divide a large claim into smaller sections or plots. This is useful when you want to let other players build on parts of your land without giving them access to the entire area.
For example, if you manage a town, subdividing lets you assign specific plots to town members. They can build within their plots but won’t be able to modify anything outside of them.
Important: Trust levels from your main claim automatically extend to any subclaims. If you trust someone in the main claim, they’ll also be trusted in the subclaims. To change this and set specific permissions for a subclaim, use /RestrictSubclaim. This stops the subclaim from inheriting permissions from the main claim.
- Subclaims do not use additional claim blocks.
- Subclaims are marked out using iron and wool blocks.
- Only the main claim’s owner can create subdivisions.
- Trust levels in subclaims follow those of the main claim by default. You can grant additional permissions in a subclaim, but you cannot restrict the inherited permissions unless you use /RestrictSubclaim.
Creating Subdivisions
- Start by holding your golden shovel and typing /subdivideclaim to enter subdivision mode.
- To mark the new subclaim, right-click one corner of the area you want to subdivide and then click the opposite corner. This is similar to how you create a new claim.
- Once marked, the boundaries of the new subclaim will be outlined with iron and wool blocks. To exit subdivision mode and return to normal claim settings, type /basicclaims.
Claim Permissions
- To give a player permission to use your buttons, levers, and beds. Use /accesstrust [Player]
- To give a player permission to use your buttons, levers, beds, crafting gear, containers, and animals. Use /containertrust [Player]
- To give another player permission to edit in your claim. Use /trust [Player]
Public Claim Permissions
If you would like to grant everyone (the public) certain permissions, simply replace the Player name with public. i.e., /accesstrust public would grant everyone access to use your buttons, levers, and beds. But not containers, animals, or building. Please be extra careful with using this command as it can grant any player the permissions you’ve assigned. You can use /trustlist to view the claim’s current permissions.
Removing Claims
To delete a claim, simply type /unclaim while standing inside the claim you wish to abandon.
Banning players from claims
To ban a user from entering your claims, use the command /banfromclaim [player]

Claim Removal Guidelines
Our overarching principle is to preserve the integrity and historical value of players’ builds on our server. As such, the removal of claims is generally not permitted. However, we recognize that certain circumstances might necessitate an exception.
The following conditions may warrant consideration for claim removal, although the final decision rests in the hands of our senior staff:
- Minimal Progress: A claim may be considered for removal if it shows little to no progress. This refers to claims devoid of player-placed blocks, builds, containers, etc. Smaller claims in this category are more likely to be eligible for removal.
- Recent Claims in Proximity: If a claim was established within the past two weeks and is situated within 100 claims of your own (which were originally made well in advance).
Remember, these are guidelines and not guarantees. Each case will be assessed individually, and the final decision will always be at the discretion of our senior staff.
Mob Cap Limits
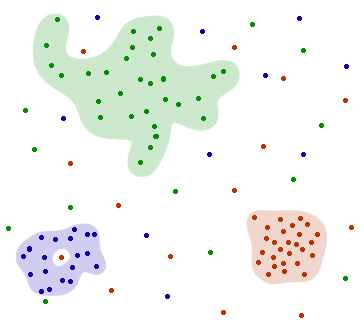
On CatCraft we keep the mob-spawning mechanics as close to vanilla as possible while still maintaining a smooth and fun experience. Here is a list of useful notes for mobs on CatCraft.
- Mob caps apply per player (not server-wide), so a single big farm on the server is not taking all the mob spawning and to prevent laggy farms.
- Phantoms are off by default. They only spawn for players who turn them on with /phantoms toggle.
- Mobs spawned from spawners will not have AI but they still have water physics enabled to allow spawner-based farms to work. This allows everyone to create huge spawner farms, without putting any strain on the server to cause lag.
- There are limits on how many of each mob can be close together, for example up to 30 farm animals within 20 blocks on the Red and Blue Realms (25 on the Green Realm). Mobs above a limit are removed, and name-tagged mobs count too.
- Hoppers, pistons, observers, repeaters, redstone dust, spawners and beds are limited per chunk.
The limits are a little different on each Realm. See Farm & Entity Limits for the full list, including vehicle limits and how mob spawning works near players.
Please keep in mind that these mob caps may change over the years, so use these as a general guideline and always consult the latest changelog channel on our discord server for updates.
AFK Spot
The ideal AFK-spot for any natural mob-spawning farm is 48 blocks (Or slightly within this range).
Troubleshooting Villager-based Farms
Villagers in Minecraft put a lot of strain on server performance due to their complex pathfinding and AI. To help with this, we use a feature that enables players to create large trading halls without affecting performance by disabling the villagers’ pathfinding (movement). This allows the villagers to refresh their trades while keeping the server running smoothly during busy times.
Villager Breeders & Iron Golem farm Troubleshooting
When building a villager breeder or iron golem farm, it’s important to remember that these farms require the villagers to pathfind (move). To ensure your farm works correctly, please give the villagers enough space to move around, so the server recognizes them as part of the farm and not a trading hall.
Iron Golem farms require villagers to alternate between scared and unscared states in order to sleep and reset internal timers. Recent optimizations to shapes and hitboxes in PaperMC server software have made some farms non-functional. The constant presence of zombies causes villagers to remain scared and unable to reset their internal timers.
To address this issue, it is important to design the farm with sufficient time for villagers to switch between scared and unscared states. An example of a working design can be found at https://www.youtube.com/watch?v=ZMD4KlXdkqs
Private Chests
- Right-clicking a container using a sign will lock the contents.
- To give your friend access to the locked chest, use the command /blocklocker 3 [username] while looking at the sign.
- To add a second friend, simply do /blocklocker 4 [username]
- To allow hoppers to suck items from a container, add the [Redstone] tag to the private sign.
Top Building Tips from the Builders of Catcraft
- Terraform your land, plot out a foundation for your build, and create a mental map.
- Pick a block palette.
- Find inspiration from online. E.g. reddit, Instagram, #player-builds on the discord server etc
- Use custom heads to decorate your builds. Type /heads to open the custom heads menu.
- Work with your environment, not against it.
- Find a build theme that suits you the most.
- Claim land that is slightly larger than the actual size of your build, to allow for plenty of room for decoration.
Check out https://1280px.github.io/hueblocks/ to easily generate colorful Minecraft block gradients.